
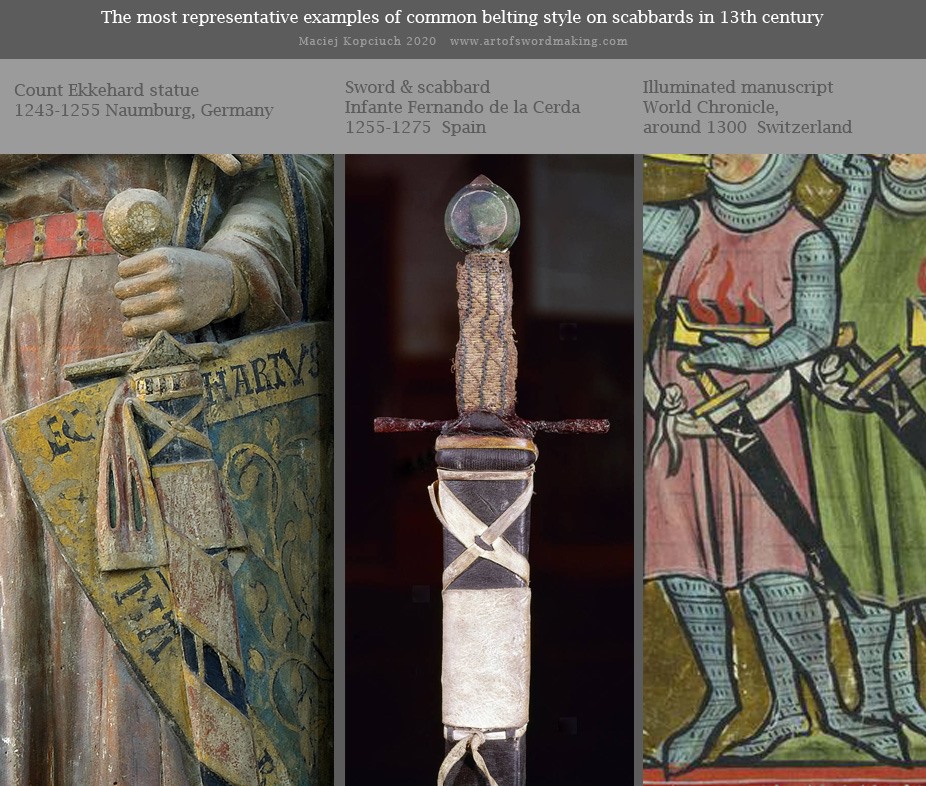
Belt position on scabbards 1050-1380
Show all articles Belt position on scabbards 1050-1380 CORRECT POSITIONING OF BELTS ON MEDIEVAL SCABBARD: (1050-1380) of the particular style shown on examples below. One of the most common mistakes about making modern scabbards I see is the completely incorrect placement of both belts on the scabbard. Every preserved original example shows the correct belting position. At the same time, almost every depiction in medieval art also explains how it should be placed on 1 the scabbard. However, for an unknown reason, many modern scabbards repeatedly show it at the wrong height… Let me explain: First thing: The upper belt (wrapping) should be placed just under the scabbard’s collar / slot. The reason is simple: 2 If it is placed lower, then the sword will not be stable, especially the longsword, because you cannot place the suspension too close to the balance point of the sword. That’s why they originally always made 3 it as high as they could, also to keep the sword at a slight angle to the ground in a stable position. Also, that’s why the lower belt is placed lower. If you place the upper 4 belt too low and closer to the balance point of the sword, then it will begin to swing and follow the balance when walking / running / horse riding. This can be uncomfortable and cause the sword to come loose, move, 5 and slide from the scabbard over time. Of course, the bottom belt will keep it more or less in place depending on the blade length, but the whole thing will simply not be historical. Second thing: the lower belt. The modern problem is again with placing it sometimes much too low, even very close to the scabbard’s center area. I could repeat all 6 the reasons from above again. But we can simply check and understand medieval examples again. Supplement: The above remarks refer to the specific style of strapping shown 7 in the examples. Other styles of belting can be found at different levels. Correct positioning of belts in this 13th-century belting style is not a matter of individual style or custom choice, etc. When you make a medieval scabbard, we should follow original examples and understand the reason. Especially when we have plenty of them and we can 8 easily study and find out how it should be done. The next reason to do it right is surely the correct, safe, and convenient use of old and proven solutions.